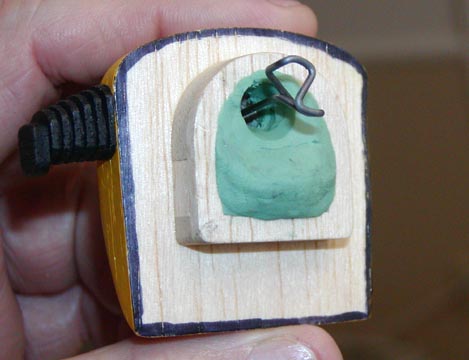
This morning, my friend Jerry Burk and I took the J-3 Cub and drove over to Mike Midkiff's place in Hurst, Texas. Mike made up one rubber motor to be used for test flying. It consisted of 8 strands of 1/8" TAN 2 "Sport" rubber, I think he called it. He showed me how to tie the knot in the rubber and then he carefully lubricated each strand of the motor with a rubber lubricant called "Dowel Corning 33". He fitted the front of the motor with "Crockett hook". He hooked the rubber motor to the prop shaft on my J-3 Cub's nose block. Then he hook up the rubber motor on his bench, stretched it out, and put in 150 turns with his 10-to 1 winder and let the prop go. After a couple of runs, Mike decided he was happy with length and number of strands for test flying purposes. We then installed the rubber motor in the fuselage and checked the balance point, which naturally turned out too far forward. We added green clay to the back of the nose block as shown at left to set the balance the model for flight testing.
This shows the 8 strands of 1/8" TAN 2 "Sport" rubber motor hooked to the back of the prop shaft with Crockett hook.
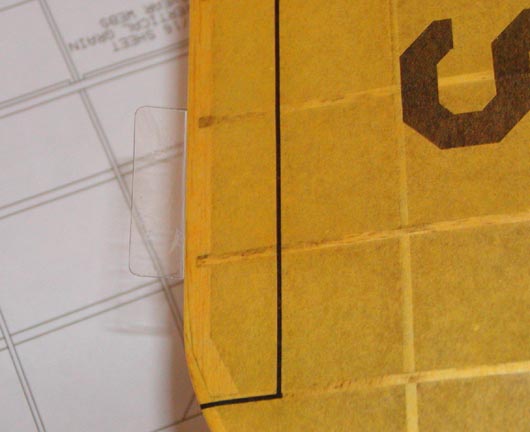
Mike checked out the wing and stab for warps and discovered the right wing had a slight wash-in (TE down) out near the tip. So he made the clear plastic tab bent slightly up to provide compensating wash-out (TE up). When I got back home, I glued this clear plastic tab on to the bottom of the wing's TE with Formula 560 canopy glue as shown below.
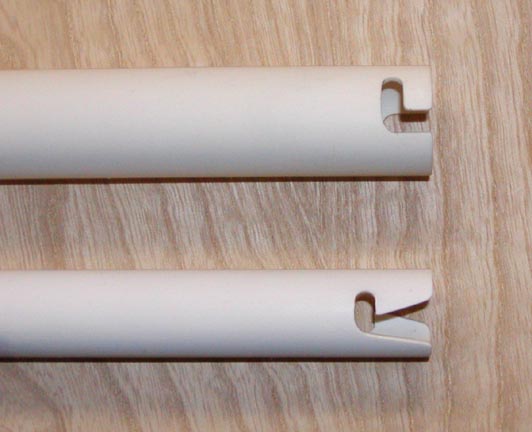
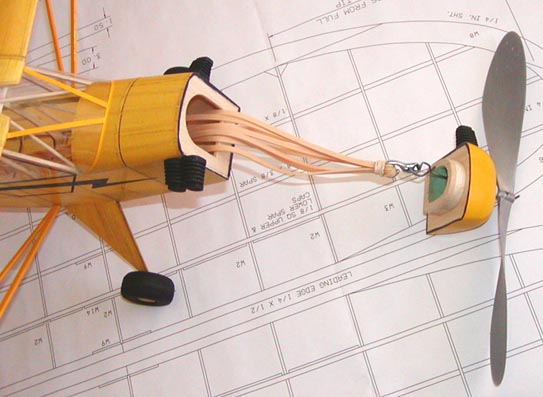
We used Mike's Stuffer stick to install the rubber motor in the fuselage of the J-3 Cub. We used Mikes wire to insert my blast tube, which was really larger in diameter than necessary and I had a little trouble engaging the end of the blast tube on the motor pin. Using Mike's 10-to-1 rubber motor winder, we stretched out the rubber motor and put in 150 turns. Then Mike had me go through the drill of removing the blast tube and hooking the Crockett hook the back of the prop shaft. Then we let the prop go and unwind. We actually went through this drill twice so I could get a good feel on how to handle the rubber motor. Being very tactful, Mike suggested that maybe I would want to make another smaller blast tube with a little different end to make engaging the end of the blast tube on the motor pin a little more tractable. So on the way home after Jerry and I stopped for lunch, we went by the hardware store and bought a two-foot length of the smaller thin wall PVC pipe to make a new blast tube. This evening, I cut the tube to length and drilled, cut, and sanded the new end on the smaller diameter blast tube shown at the bottom of the picture at left. Notice the smaller diameter as compared to my first blast tube shown on top and "V" lead-in to facilitate engaging the motor pin.
I want to add a couple of items to last nights report for documentation purposes. What prompted me was a note I received from Larry Kruse this morning that said: The "Dow Corning 33" is a high temperature bearing grease put out by Dow Chemical Company. It's a very good lubricant, but keep it away from the knot in the rubber! It will, through capillary action, allow the knot to untie. Once the ends of the rubber strands get the lubricant on them, it's almost impossible to re-tie them or keep them tied.
This reminded me that I did not discuss the details of how Mike Midkiff tied the knot in the J-3 Cub's rubber motor. Mike tied the two ends in a square knot, put saliva on the tie, and then pulled the knot down very tight. Then he tied a second square knot over the first one. He had me stretch out the ends of the rubber on both sides of the knot and he put a drop of CA on the second knot to permanently lock it down. He told me to always do this before I lubricate any rubber motor. For those of you who have flown rubber models, this is probably common knowledge. However, for those of us who have not, this is a piece of key information.
The other item I forgot to report on was the J-3 Cub's final weight. If you recall, in Report No.76 I said that the finished weight of the J-3 Cub without the rubber motor is 79 grams (2.79 oz). With the addition of the green clay ballast weight and the flight test 8 strand 1/8" rubber motor, the all up weight is now 102 grams, which is 3.6 ounces. With the J-3 Cub's 176 sq. in. Wing area, the wing loading is 2.95 oz/sq. Ft. Hopefull, is a good value for a model of this size.....................Tandy
This is the final construction Report on the J-3 Cub. Later in the spring when the weather gets nice, Mike Midkiff has volunteered to show me how to test and trim this model. At that time, I will try to get a good picture of the J-3 Cub in flight and include it in one more report of the flight test results .
Even though the J-3 Cub is one of the more simple FAC model configurations, it has been a rather long and involved project. This project has given me a real feel for what the Flying Aces Club builders have to go through to produce their complex scale models. In closing, I hope you all have enjoyed my series on the Herr kit construction of the J-3 Cub.......................Tandy Walker
